
Karaoke Room Gear Care Guide

Daily Must-Do’s
Pro karaoke gear needs daily care for top work. Start with daily cleaning of mic tops using alcohol wipes and wipe screens with soft cloths. Look over cables to find any early signs of wear or harm.
Weekly Care Steps
Check sound quality to keep audio clear. Test sound levels all over the room to keep sound even. Regular audio tests help find and fix issues early.
Monthly Care List
- Look at the full air system
- Test all backup systems and safety steps
- Full cable care including connection tests
- Watch humidity and room conditions
- Check sound block quality
Every Three Months’ Tech Care
Plan pro color tweaks for video screens to optimal fun spac keep visuals sharp. Check sound panels and swap out bad parts. Make sure all gear works together well.
Control the Room’s Air
Keep room heat always below 85°F (29°C) to save soft gear. Set up good cable paths with clear space between power and sound wires. Keep air moisture from 30-50% for gear to last longer.
Make Your System Best
Regular care shows your karaoke setup’s best power. Write down all you do and how gear reacts to make a strong caring plan.
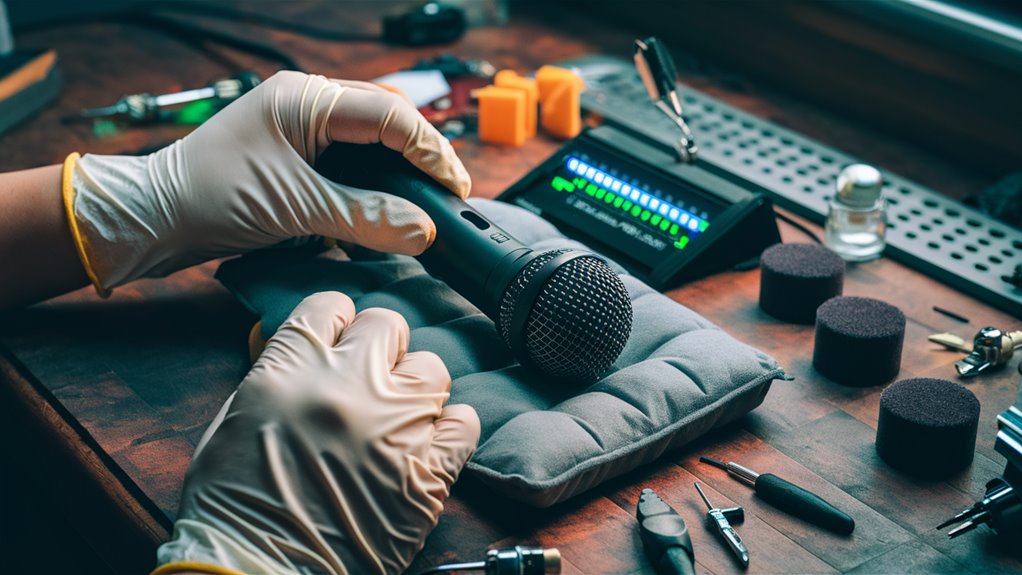
Clean and Sanitize Tools
Fast cleaning of mics is key right after each use. Use alcohol wipes right on the mesh top, where most germs gather. Wipe the mic body with a barely wet cloth to keep inside parts safe. Wash covers with soft soap, dry fully before you put them back.
Care for Mixing Boards
Safe board care starts when you unplug it. Use air spray to clean sliders and knobs. Wipe the board with special wipes. Screen care needs special cleaners on a lint-free cloth to keep the view clear and stop harm.
Cables and Speakers
Check cables each month to spot wear or break risks. Focus cleaning on connectors where dirt builds up. Speaker care means often dusting outsides and checking for loose parts that hurt sound.
Full Clean Plan
Follow a full cleaning plan with these key steps:
- Day-to-day wiping of touched spots
- Deep clean all parts each week
- Monthly care checks
- Document how you clean for steady results
This plan makes sure your tools work well and stay clean for safety and long use.
Sound System Upkeep Musts
Main Part Care
Regular sound checks are key to keep gear working long and well. Amplifier care means looking at air flow each month, including dusting off heat parts to stop overheat. Volume controls and sliders need a clean every three months with contact spray to stop noise and rough sounds.
Speakers and Tests
Needed speaker checks happen every three months, look at the outer rims for wear signs. Test each speaker with mid-level sound to find any odd noises.
Check speaker wires often for frays or harm, and make sure all mounts are tight.
Mic Care Steps
Weekly mic checks are key for great sound. Clean mic tops with soft brushes and use special wash for inside parts. Do sound tests and handle noise checks often to find issues early. Keep extra mic wires and check them each month for breaks and static.
Power and Logs
Watching the power keeps the system steady. Use guards against surges to keep gear safe. Keep good notes to track issues and plan part swaps well. Regular notes help set up care times and plan for updates.
Checklist for Good Care
- Check amp air each month
- Clean knobs and sliders every three months
- Look at speakers and wires three times a year
- Clean and test mics each week
- Watch the power setup often
- Update care logs often
Screen and Visual Care
Guide to Keep Screens Good
Screen Care Steps
Pro screen care needs regular look at both the tech and look parts. Wipe daily with a soft cloth to get rid of marks and dust while keeping the soft parts safe. For hard marks, use special screen wash on the cloth, not right on screen.
Best Set-up Choices
Brightness and Color Set-up
Long screen life leans a lot on good set-up handling. Check brightness each month and skip the top settings, which can kill the screen fast. Do color checks every three months to keep the look right and stop image stick.
Tech Care Steps
Keep the software right with regular system updates to stop bugs and safety risks. Look at pixels every three months, write down any dead ones to track screen wear. For projectors, clean the filters each month and swap lamps before they wear out to stop breaks.
Air Handling
Keep the air set right by keeping vents clear and watching the room heat stay below 85°F (29°C). This keeps the screen working its best and makes it last longer with right air care.
Song List Handling
Top Way to Sort Karaoke Songs
How to Sort Songs
Sorting songs right needs a clear way focused on easy reach and smooth use. Set up clear name types and sort by style, language, and singer names. This base makes live shows smooth and helps find songs fast when needed.
Back-Up Plans
Keep your songs safe with a few copy ways:
- Main computer save
- Back-up hard drive
- Cloud spots
Make sure all files stay in the right format (MP3/MP4) and match the words well across all spots.
Pro Song Sorting
Sorting well starts with full keep of tracks. Make detailed song lists showing:
- Song names and singers
- Language choices
- How long they play
- File types
- Tech needs
Best Care Ideas
Set regular song care jobs:
- Clear out same songs
- Check file health
- Test new songs before use
- Watch license rules
- Update song info often
- Check formats often
These steps make sure your system works well while sticking to law and tech needs.
Power and Wires
Pro Power and Wire Guide for Karaoke
Power Tips
Good power flow is key for smooth karaoke. Order wires with safe paths and strong ties to stop trips and keep power steady. Put in strong surge stops set for at least 2000 joules to keep pricey audio gear safe from bad power jumps.
Best Audio Wire Ways
Pro sound setup needs at least 6 inches space between power and sound wires to cut bad air waves. Use color marks and heat labels for fast fixes and care. For top sound, use balanced XLR plugs with good hold bits at connections.
Wire Care and Keep
Look at wires each month, focus on areas near plugs for wear. Swap wires showing hurt or naked wires fast. Use the over-under way to keep wires and keep them from heat and busy spots. Put in pro wire systems to hide extra wire lengths while keeping looks and protection against unplugs.
Mic Tests and Fixes
Pro Mic Check and Fix Guide
Need-to-Know Care
Often mic tests are the base of pro sound care. Set up a weekly test plan to make sure mics work their best by checking these three key parts: sound tests, look overs, and cordless tests.
Sound Testing Ways
The step-by-step test plan starts with deep sound checks. Check each mic by:
- Talking from different spots and loudness
- Listening for odd noises and rough sounds
- Testing sound range rightness
- Looking at XLR plugs for rust
- Checking wind covers and tops
Physical Care Steps
Gear look-overs should focus on:
- Finding breaks like bends or cracks
- Making sure bits are tight
- Deep cleaning tops with air spray
- Keeping wire joins right
- Looking at part health
Cordless Boosts
For cordless mic systems:
- Do full sound area tests
- Spot and write down likely quiet spots
- Clean battery links often
- Keep up with battery care rules
- Watch how sound moves
Deep Fixes
When normal care can’t fix problems:
- Look at maker fix guides
- Check tech details
- Write down issues
- Think about pro fix help
- Keep detailed care notes
Room Sound Fixes
Room Sound Fix Guide for Top Sound
Look at Room Sound
Room sound is big for how well sound works. Knowing and making your space’s sound right gives top voice and sound clearness. Start with a full sound check by making sounds in different room spots to find trouble spots.
Handle Echo and Sound Bounce
Managing sound bounce starts with finding click here echoes and reverb issues. Do sound tests by making sharp sounds in spots and listening for echoes that last over a second. Set up sound panels right on walls facing each other and put bass stops in corners to handle low sound build-up.
Where to Put Speakers
Right speaker spots are key for even sound. Put sound boxes at ear height with 45-degree turns toward the main sound area. Keep them two feet from walls to cut bass sound build-up. Make a even speaker set-up from where you hear to cover sound well.
Working on Hard Spots
Softening sound needs care with hard spots. Put sound soft stuff on hard spots like windows and tiles using heavy curtains or special sound stuff. Work on floor sound care with carpets or rubber mats. Mix softening with spreading to keep natural room sound while cutting unwanted bounce.
Pro Sound Setting
Room setting makes sure sound is at its best through careful checking and fixing. Use sound check tools to see sound range and make smart choices on where to put treatments. Think about pro sound help for tricky spots needing deep checks and custom fixes.